Just before the scuba season in Pulau Redang, Terengganu
closed, ANDREW SIA managed to sneak in some dives and partake of an
underwater photography media workshop.
In the old days, scuba photography was a prohibitively expensive
hobby as special underwater casings for SLR cameras could cost up to
RM10,000 and beyond. Also, there were a limited number of
underwater-only film cameras.
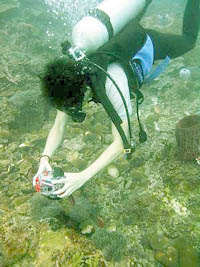
An enthusiast trying out an underwater
camera.
But with the advent of
digital cameras and ready-made casings for them, scuba photography
has become a much more affordable pursuit. For instance, the 5
Megapixel Olympus C-5060 digital camera and its casing (that we used
during a hands-on workshop conducted by Olympus Malaysia at Berjaya
Redang Beach Resort in October) costs under RM4,000.
The other camera that I “test-drove” was the 8 Megapixel C-8080,
which received the EISA (European Imaging and Sound Association)
awards for Best Digital Camera 2004/2005 in September.
The workshop was conducted by dive instructor/photographer Pamela
Lim, secretary of the Malaysian Sport Diving Association and project
director of Reef Ball Asia. Here are some of her tips for successful
sub-aqua picture-taking, and my experience as a virgin scuba
photographer.
The scuba part of it
Your buoyancy has to be fine-tuned to protect the corals – and
yourself!
“Preferably don’t touch anything,” said Lim. “But if you have to
stabilise yourself for a shot, use one or at most two fingers on
rocks, NOT corals.”
As a general rule, new divers should do at least 20 to 30 dives
to accustom themselves to the sport, build underwater confidence and
sharpen their buoyancy skills before using cameras underwater.
However, some divers may adapt faster.
When taking pictures of fish, don’t chase it. Anticipate where
it’s going and get your camera ready.
“Fool it into thinking that you’re a big, slow fish,” she
quipped. “If I see a batfish, I will signal you guys: WAIT. The
batfish will come and play with your bubbles.”
An old problem with digital cameras is that of shutter release
lag times; that infuriating delay when it seems (to a film camera
devotee) to take forever for the camera to catch the image after
pressing the button.
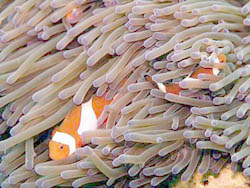
In this aspect, the two cameras, with their short lag times (0.3
sec and 0.4 sec for the C-8080 and C-5060 respectively) made it
easier for this writer to catch Nemos (clown fish) darting about sea
anemones.
When taking a shot, if your leg happens to touch some corals,
don’t kick about.
“After taking the shot, just take a deep breath and slowly float
up without damaging the coral,” advised Lim.
For some of the more unusual photography targets, you have to
know your subjects, where to find them, what they eat. You have to
understand their habitat and lifecycle.
“For example, if you want to take pictures of sea horses and
ghost pipe fish, you have to look amidst sea grass,” noted Lim.
Sea cucumbers bury themselves in the sand and only emerge at
night. Flounders and rays are found on sandy seabeds while some
nudibranchs are associated with particular soft corals.
“The flabellina nudibranch feed on hydroids to get its stinging
cells,” related Lim. “So when you see hydroids, get your camera
ready for flabellinas as well as sea spiders and sea crabs.”
The camera part of it
Using the built-in flash can be problematic especially in less
than clear seas as there will be “backscatter”. A whitish “haze”
appears in the picture as the light from the flash reflects off
sediment or plankton particles in the water.
However, the built-in flash can be used for closer shots as there
are not that many particles (as the light travels only a short
distance through the water). Another way to avoid backscatter is to
use an external strobe light (attached about half a metre away from
the camera) since the light won’t reflect so harshly directly back
into the lens.
This writer found that the two cameras’ reasonably large
apertures (f2.4-3.5 for the 28-140mm range of the C-8080 and
f2.8-4.8 for the 27-110mm range of the C-5060) made it OK for
shooting in most circumstances when the sun came out. But in
October, the monsoon-imminent skies above Redang were frequently
overcast and flash had to be used especially when we went in deeper.
As a straw in a glass of water appears bent, zoom settings
underwater are narrower. Therefore, to shoot a similar wide-angle
shot (as on land) one has to move further back.
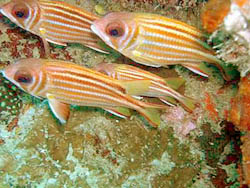
Know your underwater camera well and it
will bring you tremendous pleasure, like these pictures
(above, and below) of sea
creatures.
The wide-angle zoom
allowed this writer to capture pictures of schools of fish swimming
above corals without having to retreat too far away.
Camera care
The most tedious part of scuba photography is before the dive.
Lim recommended setting aside at least an hour before to prepare the
camera.
The waterproof case that protects the camera underwater has a
rubber O-shaped ring around the rim. This has to be meticulously
cleaned each and every time the camera case is opened and closed (to
download pictures to the computer or recharge batteries for
instance).
For me, the process was like a surgical operation. First, we
washed our hands and wiped them on a special lint-free cloth. Then
we lifted the O-ring off the casing with a special plastic scooper
before thoroughly inspecting the groove (where the O-ring was) with
a torchlight to check for the finest piece of sand, hair or even
lint.
“With the pressure underwater, even the smallest piece of lint
can cause the casing to leak,” said Lim.
Then a special grease has to be smeared thinly and evenly on the
O ring itself. And we couldn’t pull the ring too hard for fear of
distorting its natural shape and . . . you guessed it . . . end up
with seawater dripping onto the precious cameras.
It’s a good idea to put in one or two packets of silica gel into
the casing to prevent condensation inside.
Before the dive, always do a submersion test. This can be done
by submerging it (empty) in a tank of water the night before your
dive. For new casings, it’s preferable to do the Real McCoy test.
Bring it underwater – empty, of course.
After diving in situations where sand is being stirred up from
the bottom (such as beach diving) be careful to check for sand
particles lodging in the buttons. If there are any, hold the casing
with the buttons facing downwards in some water and swish back and
forth. If using compressed air do not blow directly on the buttons.
It’s easier to place the air nozzle halfway in the water to generate
a stream of water to rinse away the sand.
After a dive, always submerge the casing into a bucket of water.
Otherwise, salt may crystallise – that might cause leaks.
White balance
The deeper one dives, the bluer the water appears. This is
because the red part of the light spectrum is easily diffused in
shallower waters and fails to penetrate deeper.
Digital cameras normally have something called “white balance”
which adjusts pictures back to the “correct” colours. However,
according to Lim, since the special lighting conditions underwater
are not the same as on land, a camera’s automatic white balancing
capabilities may sometimes be overwhelmed.
The way to overcome this is to do manual white balancing. Point
the camera onto something white or grey (such as a special plastic
slate that divers use to write underwater), make sure it covers the
whole viewfinder and press the button.
“Preferably, do manual white balancing every two metres of
depth,” said Lim.
However, this was easier said than done. It required some finger
acrobatics to hold onto the large casing of the C-8080 and stretch
my thumb back to the d*** white balance button on the back while my
other hand held onto the slate. With everything tensed up, I then
had to determine whether the slate covered the whole view. One way
to overcome this is to use white or grey fins so that one can have
both hands on the camera.
Or else, just use the auto white balance and do colour
corrections on the computer later. In such a case, use the daylight
mode (of white balance) for shallow waters (up to 10m) or for
flash-assisted macro shots. For deeper waters, switch to cloudy mode
to tone down the blue. W
So are you ready for underwater digital photography? Well,
after your next dive, just hook the camera up to your laptop and let
all your dive buddies see the splendours (or horrors) of what you’ve
taken!